React-Firebase-CRUD Operations with Authentication using Security Rules.

A web developer, with a passion for building responsive and performant web apps.
Introduction:
Firebase is a Backend-as-a-Service provided by Google. It provides pre-configured authentication, storage, database etc services. React is a JavaScript library for building user interfaces. Together, Firebase and React make it easy to create applications with secure data storage and authentication. In this blog post, we will explore how to use Firebase and React to create CRUD operations with authentication Firebase Security Rules.
Some Basics:
Firestore: Also called Cloud Firestore. It is a NoSQL Database provided by Firebase.
Authentication: It is an authentication service provided by Firebase. It stores the auth credentials of the users and provides SDK to integrate third-party authentications like Gmail, Facebook, Microsoft account etc.
Security Rules: It provides a way to control who has access to data based on the user's authentication state. For example, security rules can be used to ensure that only authenticated users can read or write data, or to limit access to data based on the user's login ID.
Prerequisites:
Knowledge of Reactjs.
Google Account.
Basic understanding of Authentication and No-SQL Databases.
For this post we will:
Set up a Firebase project with simple Email/Password authentication and Cloud Firestore.
In the front end login the existing user or create a new user.
Create, read, update or delete documents in Firebase.
Setting up Firebase:
follow the below steps to set up a firebase project.
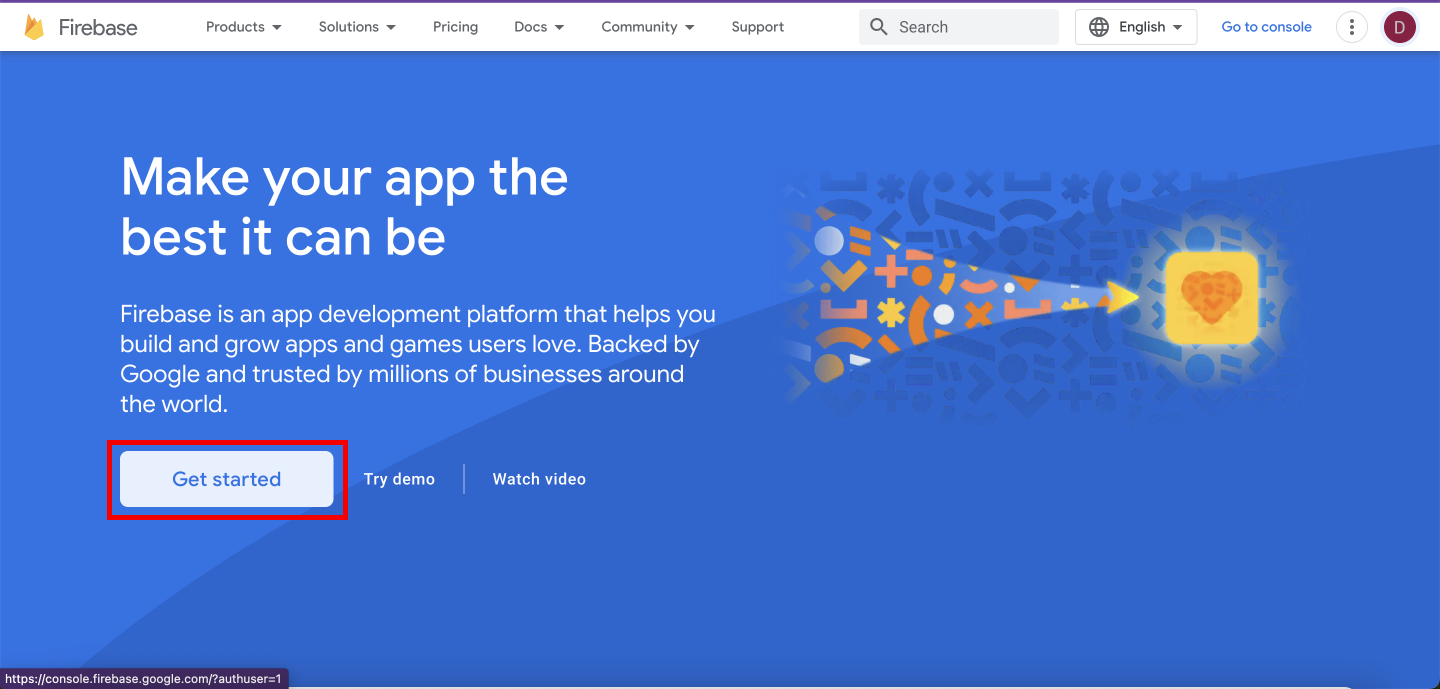
Step 1: Go to firebase. Log in with your Google account. Then click on Get started.
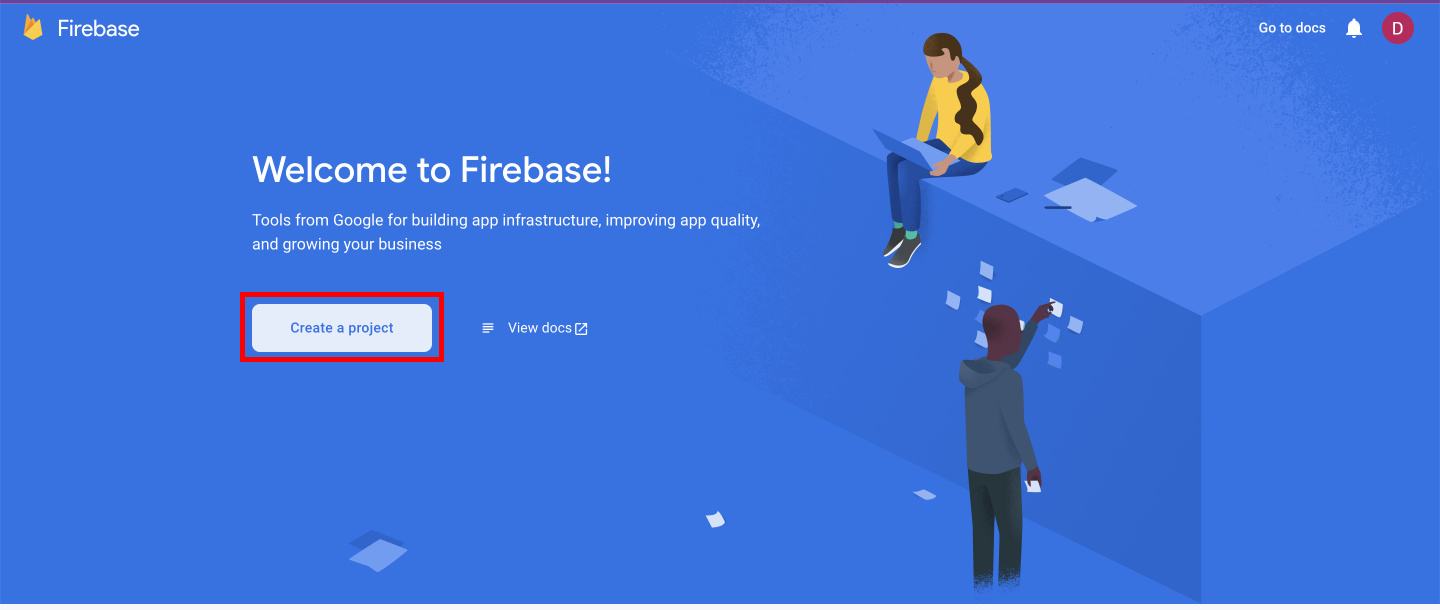
Step 2: Click on Create Project
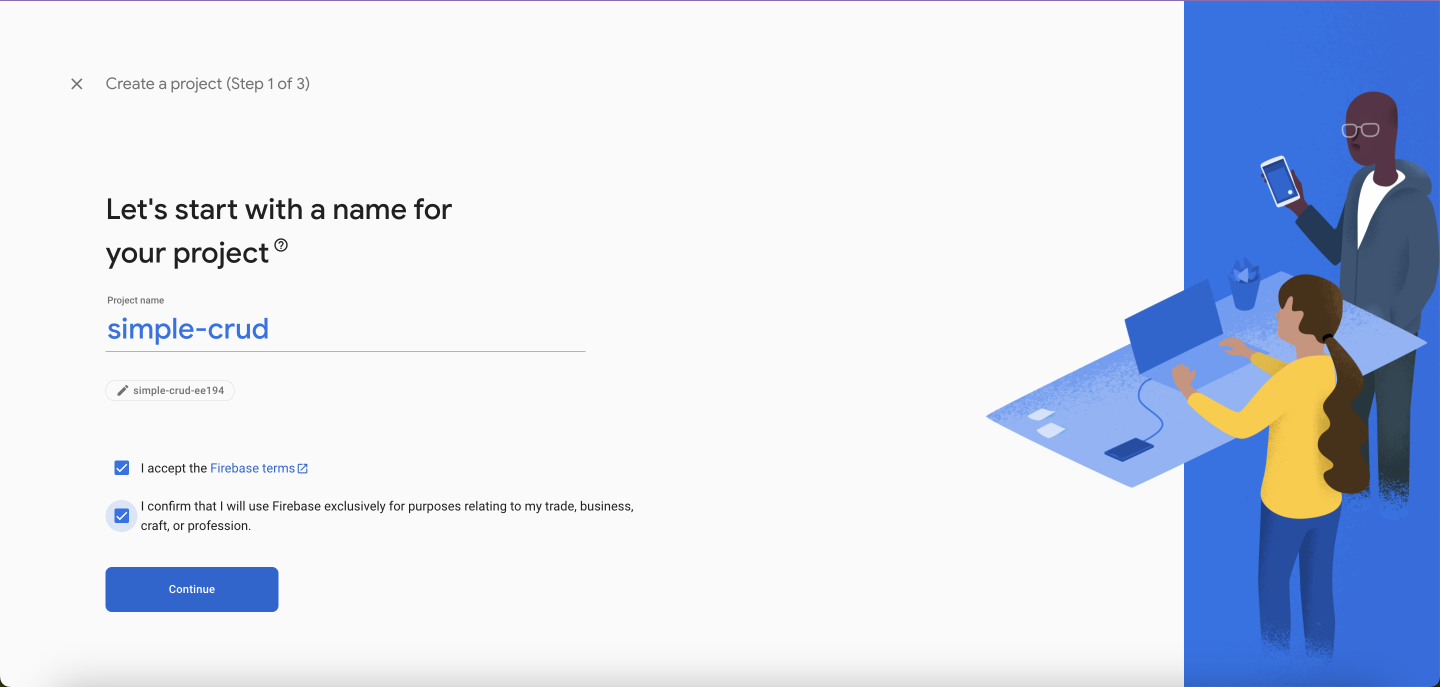
Step 3: Enter your project's name. Accept the checkboxes and continue.
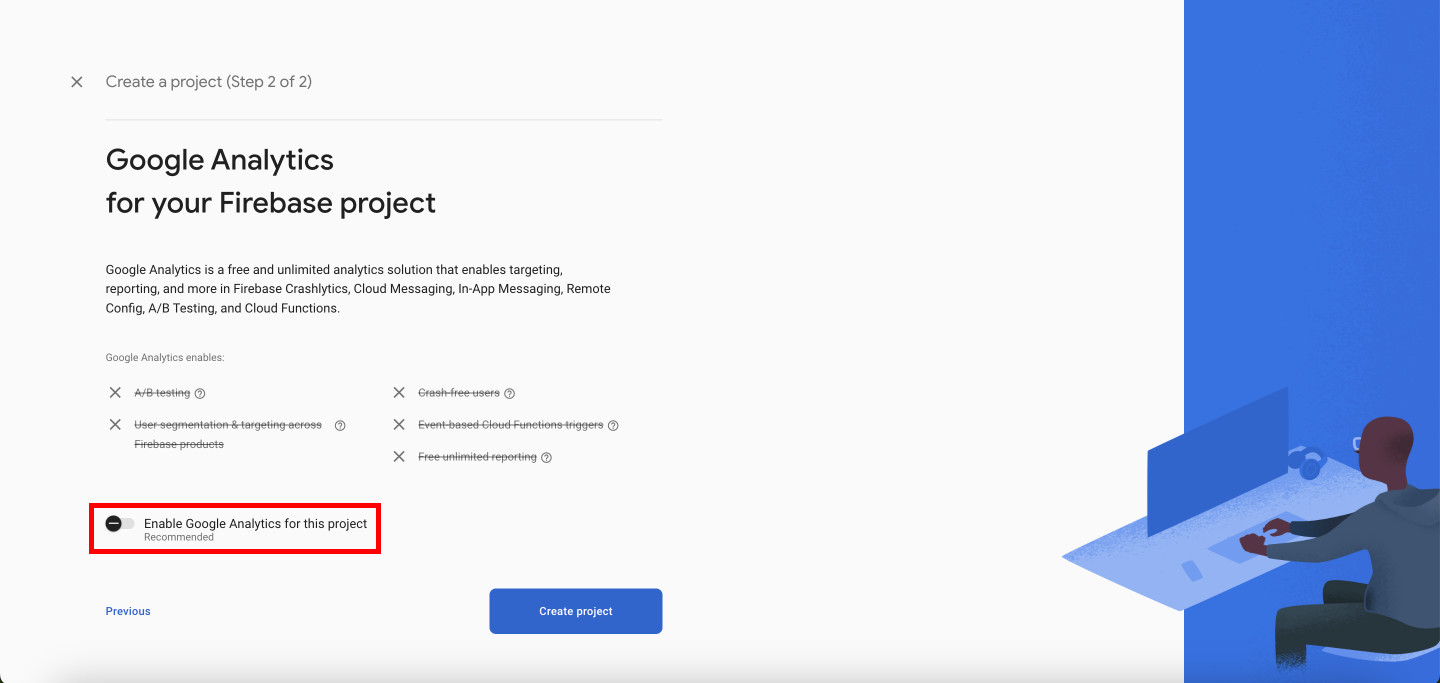
For this project, we don't need testing and monitoring so disable the Google Analytics toggle and continue with Create project.
After clicking Create project, Firebase will create your project instance. It takes some time, please wait.

Then continue.

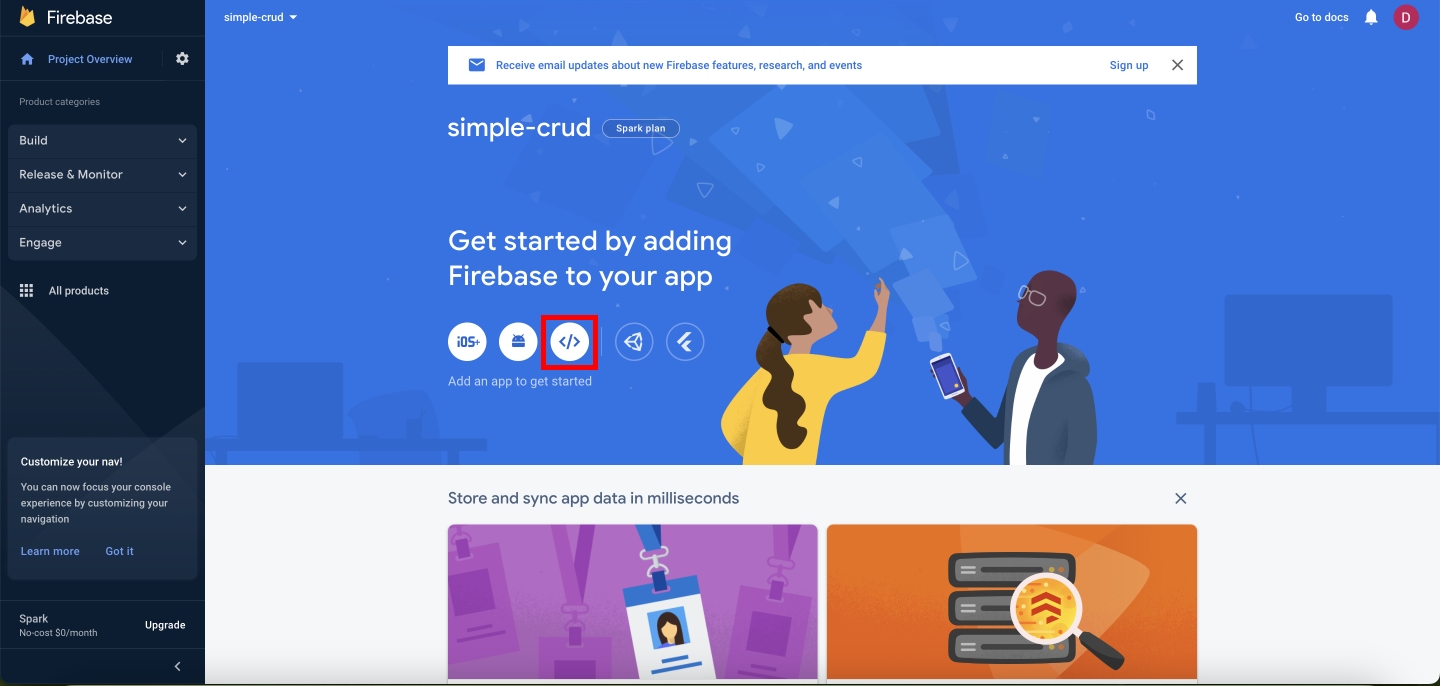
Step 4: After continue you will be directed to your Firebase project's console. There select the icon that looks like a closing HTML tag. It will create a new app for our project. In Firebase an App is a way for other applications like android, ios, websites etc to communicate and interact with your project. You can have multiple apps in the same project. Here we are creating a web app.
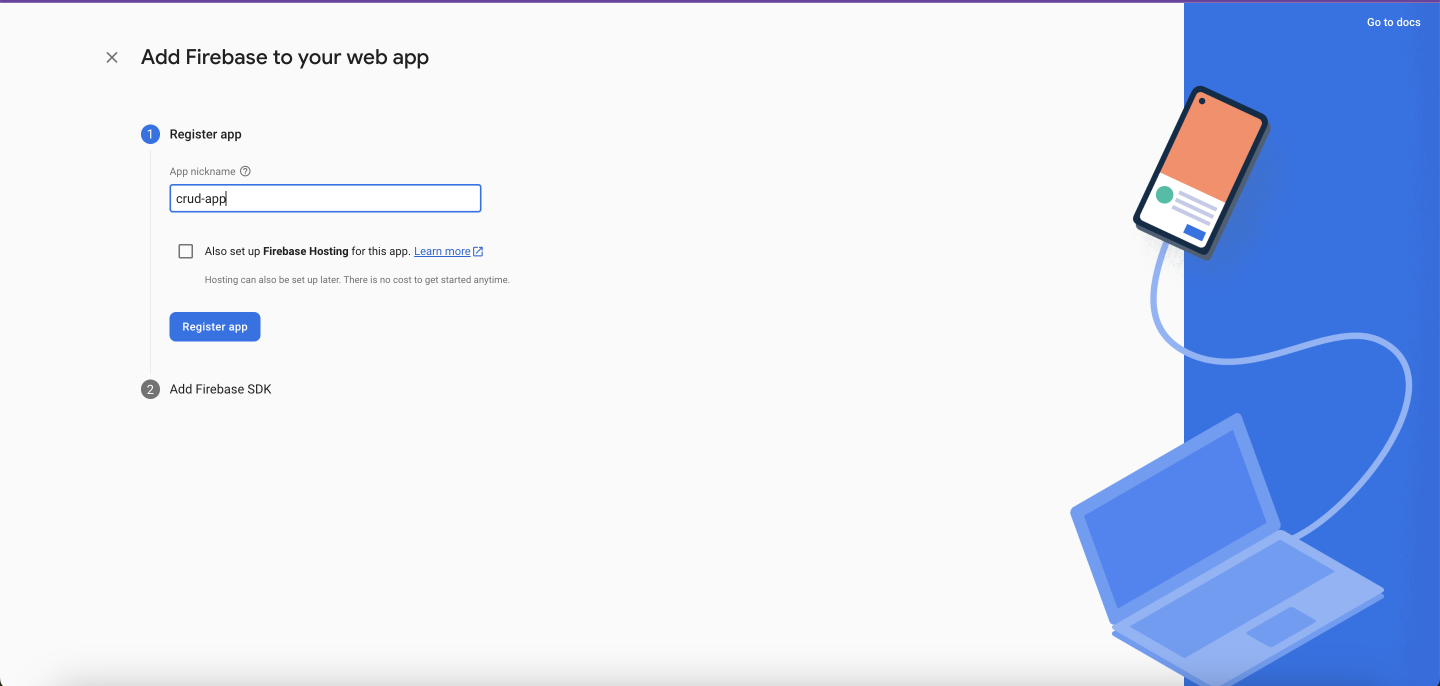
Add a name to your app.
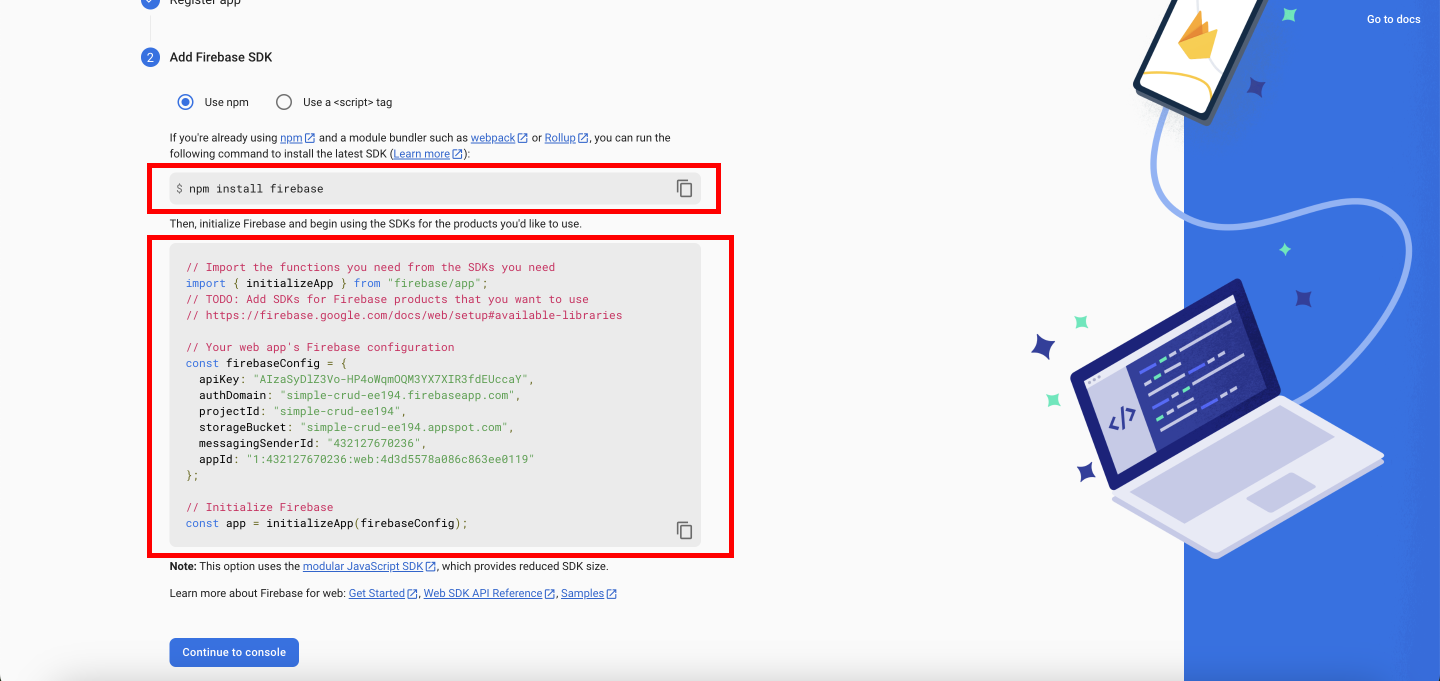
Firebase will provide an npm install for the Firebase SDK and a snippet to initialize your firebase app in the frontend code. Install the SDK and then in your ReactJS code base create a utils/firebaseSetup.js file and copy and paste the snippet. Then click on Continue to console.
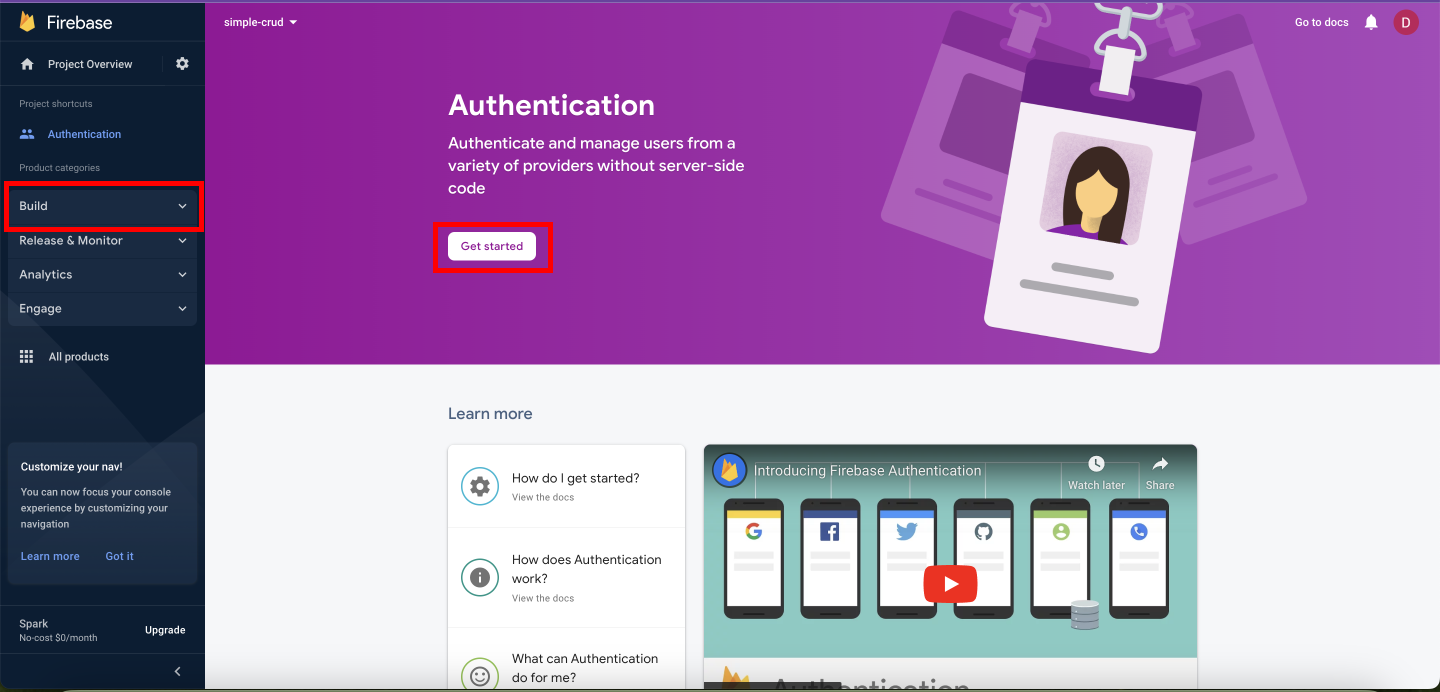
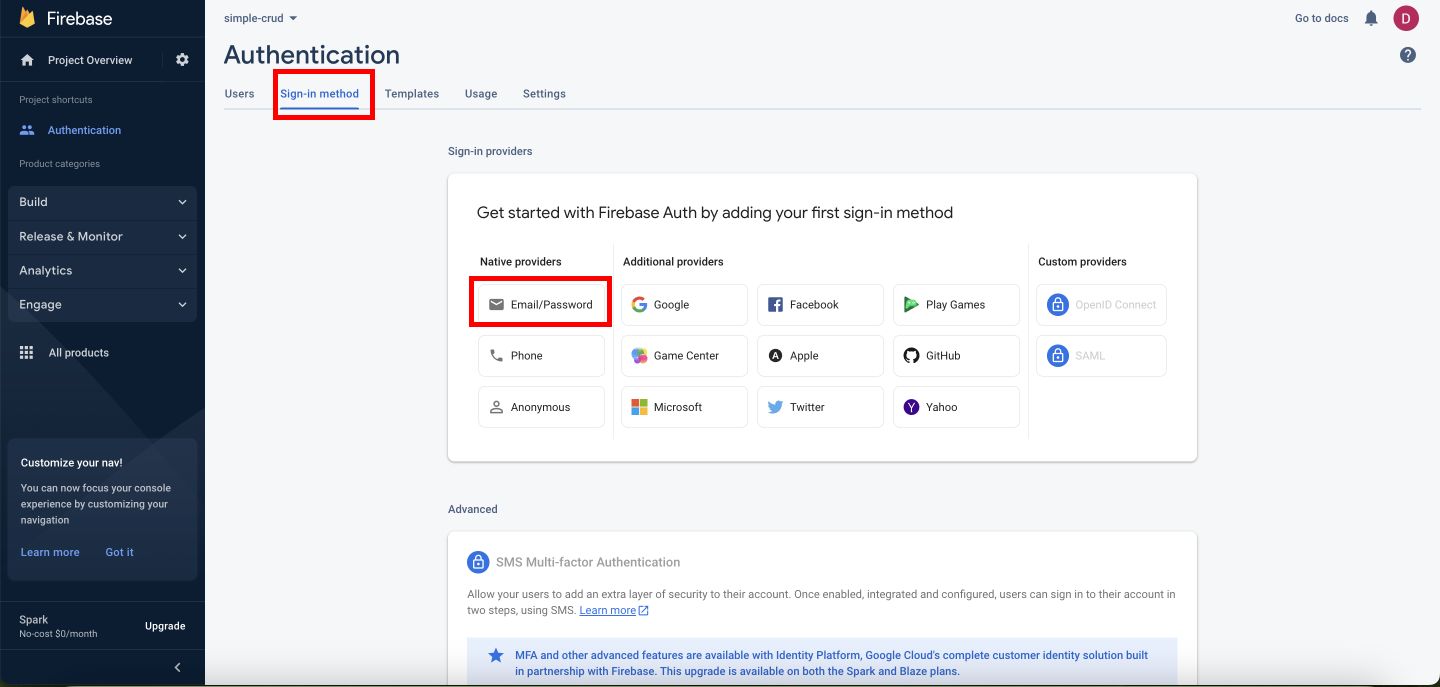
Step 5: After returning back to the console. From the left menu select Build, a dropdown menu will open from there select Authentication. Then from the Authentication page click on Get started.
Step 6: For our application, we will only use simple email and password authentication. Select the Sign-in method from the top menu and then select Email/Password from below. As you can see Firebase provides authentication through a wide range of services, feel free to explore them.
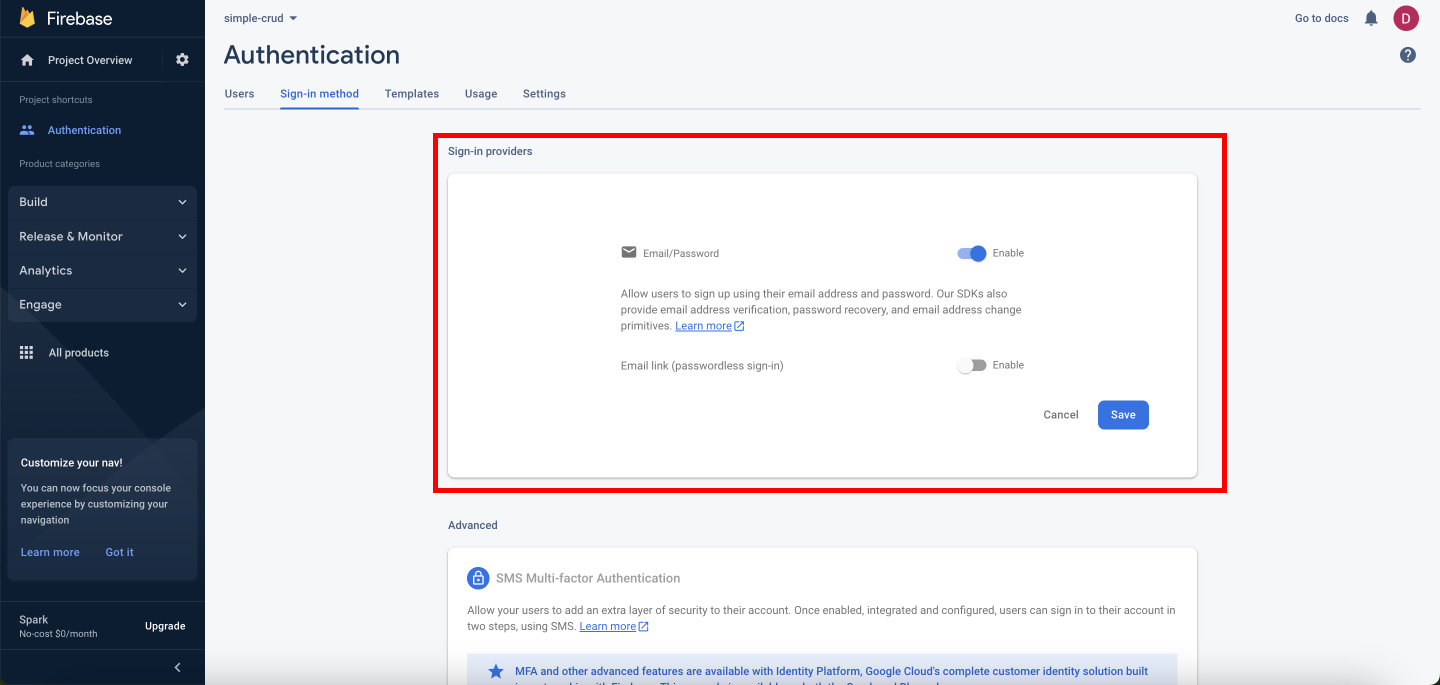
Enable Email/Password and then click Save.
Step 7: Now Select Users from the top menu and then click Add User.
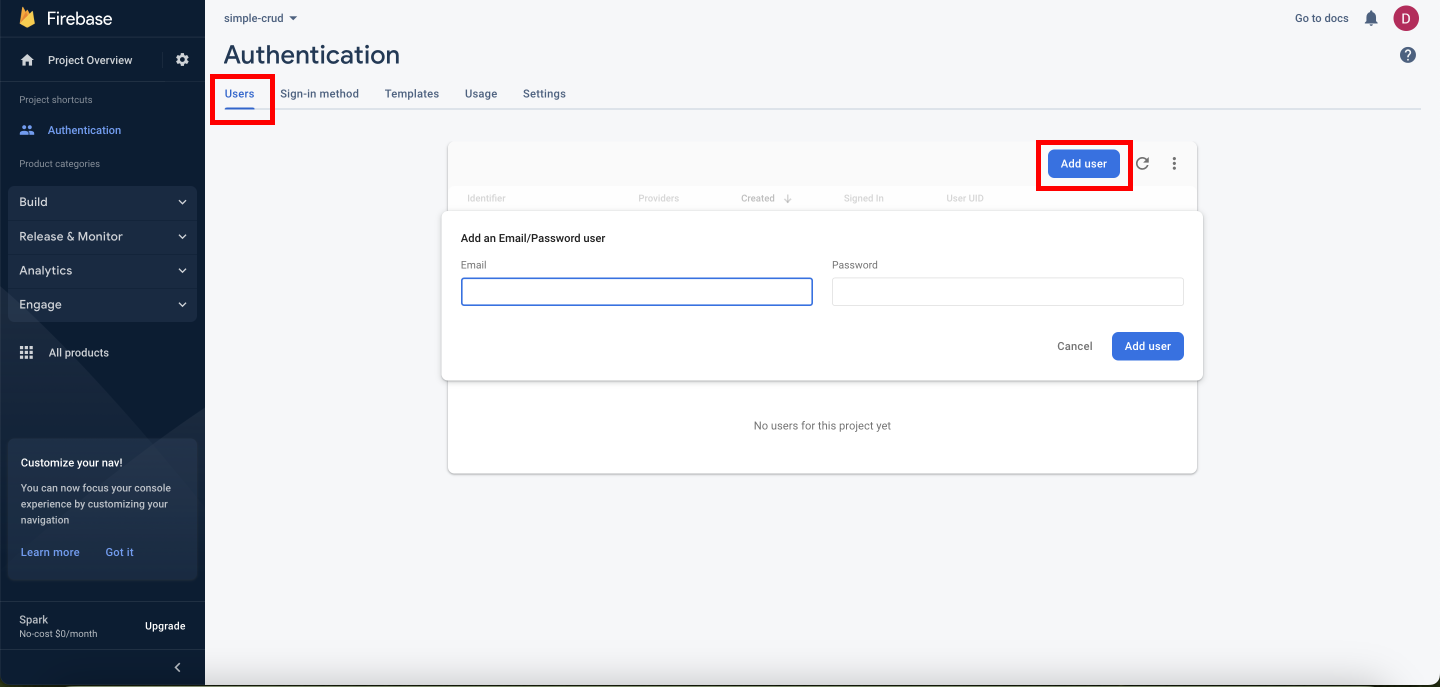
Enter your user's Email and Password. Click the Add user button from the popup to save the user.
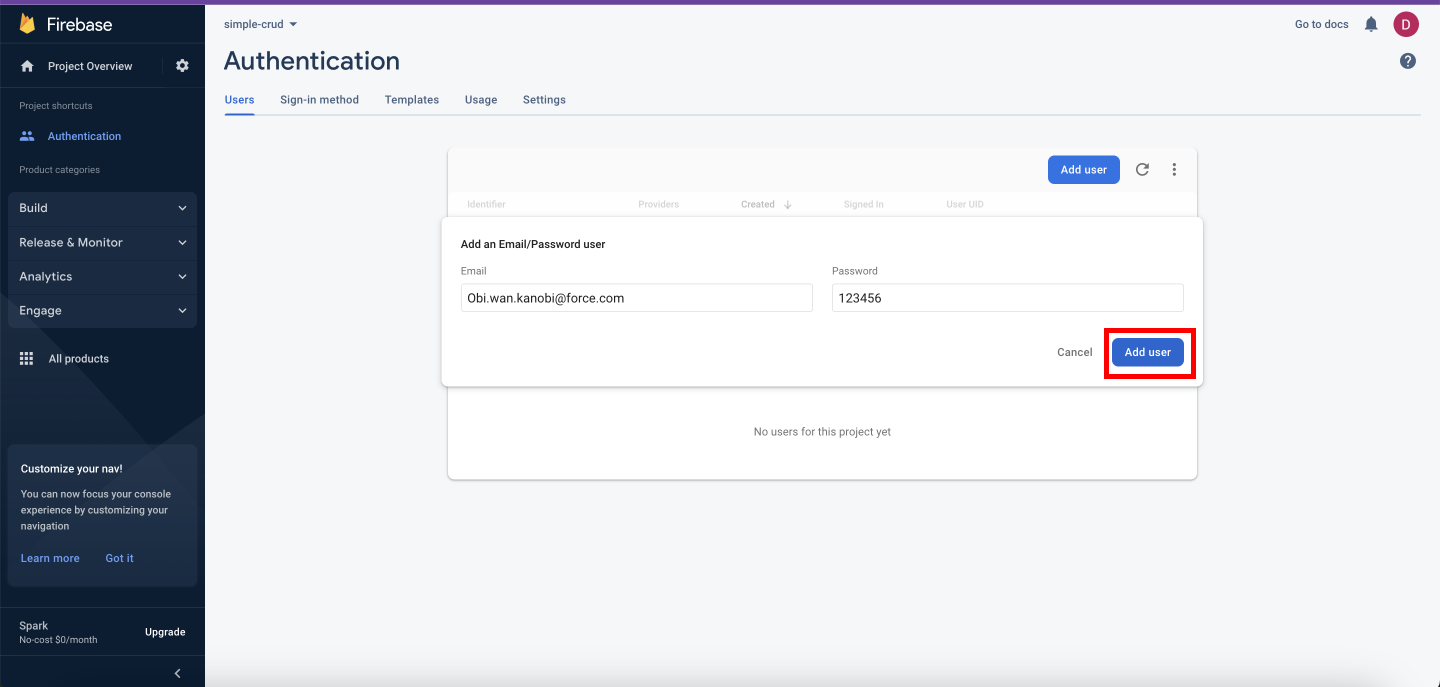
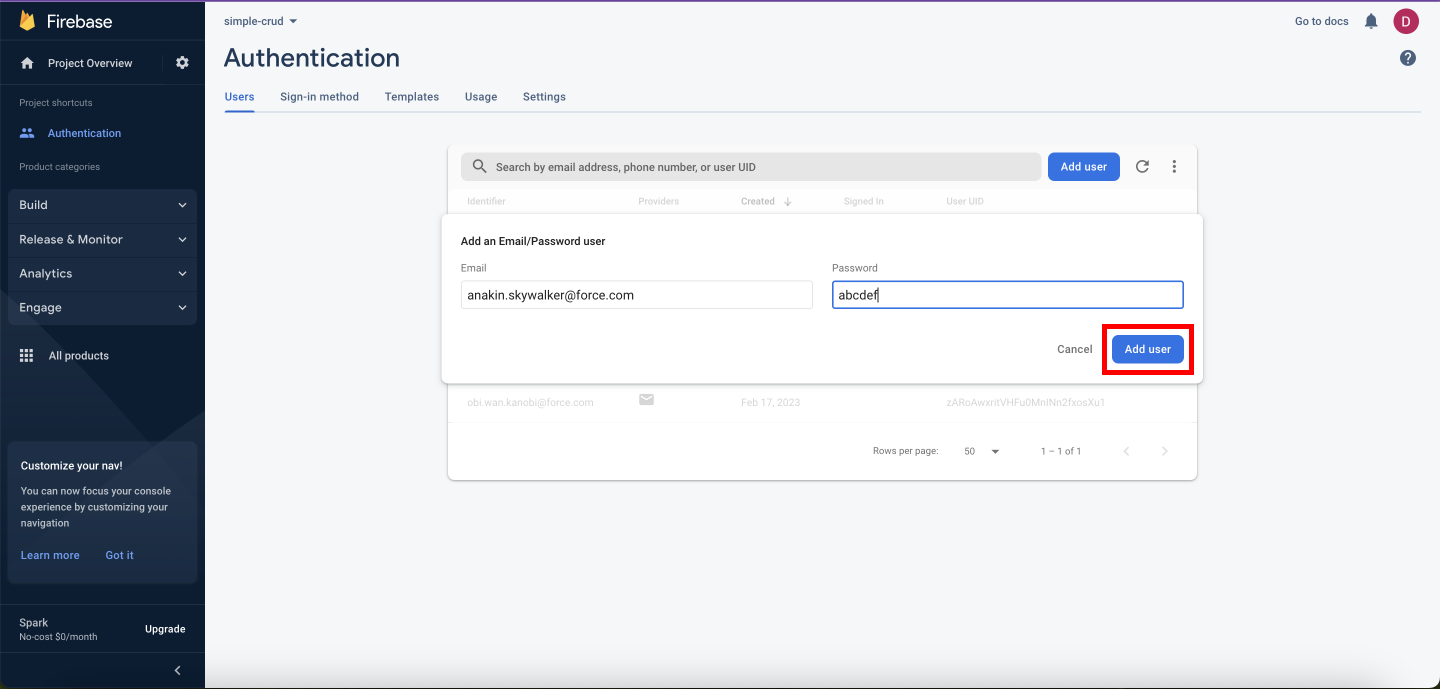
Step 8: After creating the users. User's credentials will be saved and a unique UID will be assigned to each user, copy this we will later use it in FireStore.

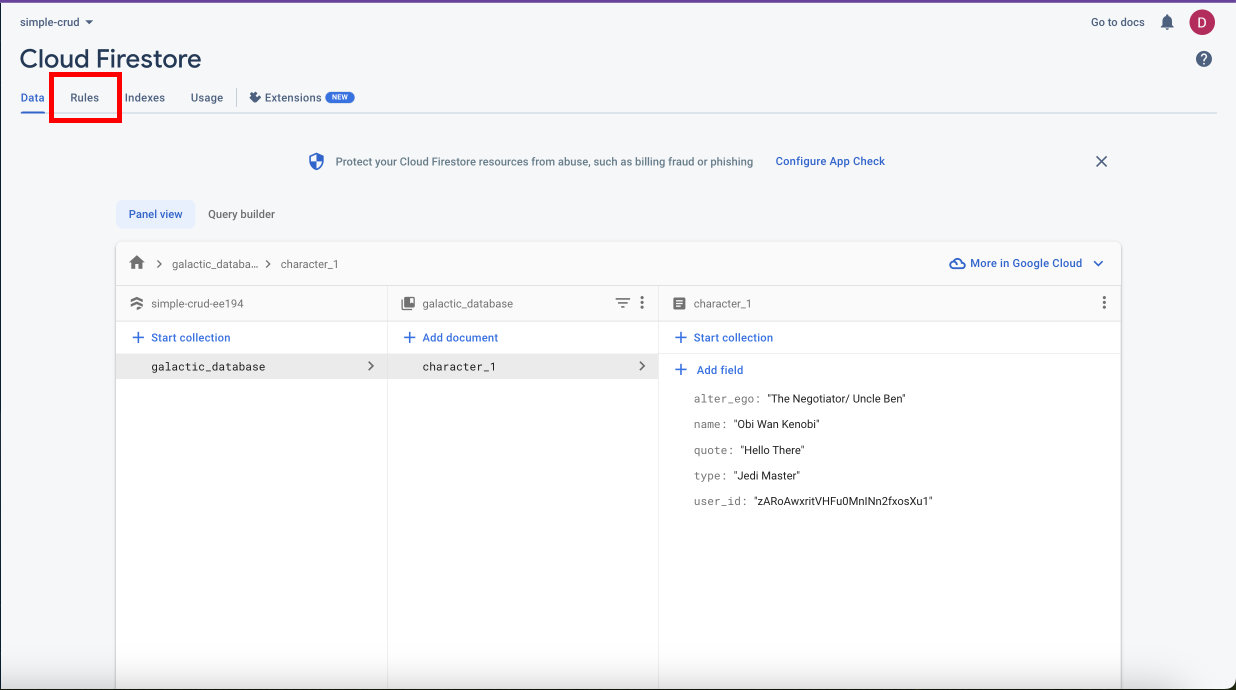
Step 9: Move back to the console and this time choose Firestore from the left menu. And click Create database.

Since we will be using Security Rules, select production mode.
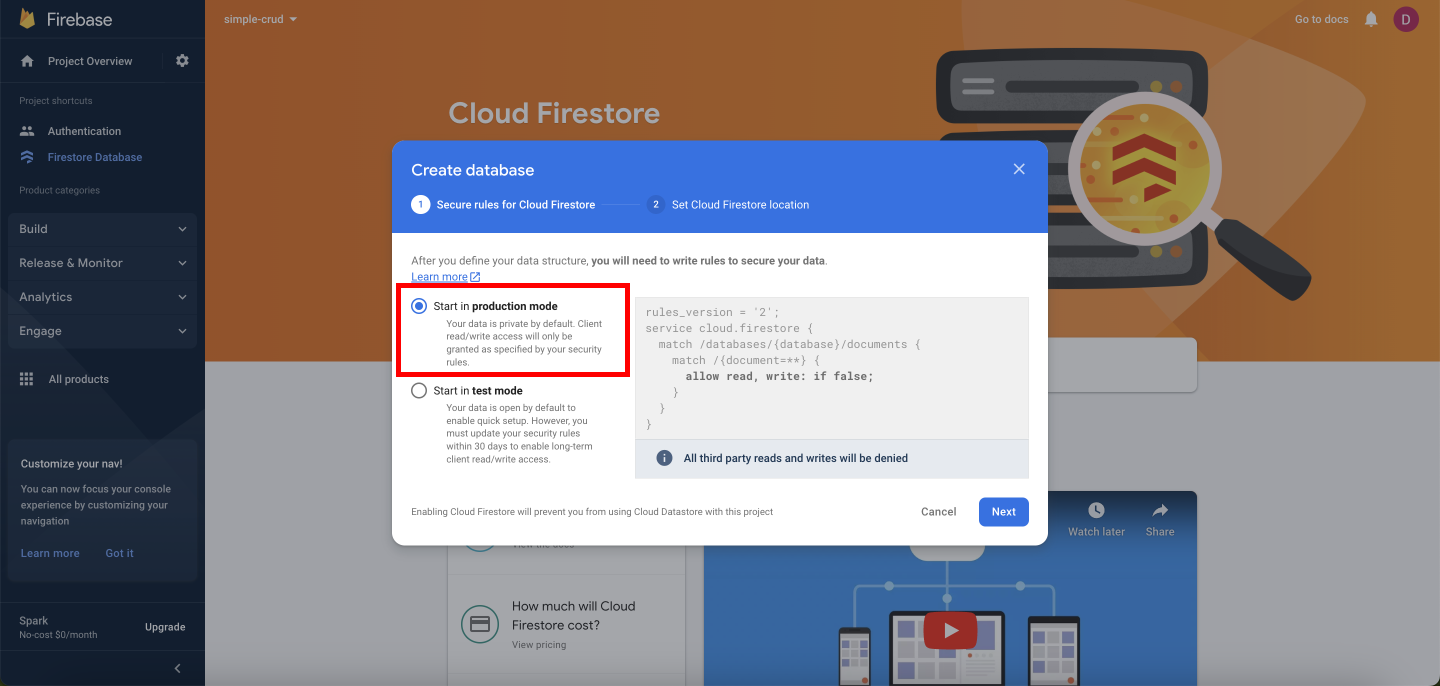
Select your Firestore's server location. Then click Enable.

Step 10: Now create a new collection.

Add entries and create your documents. Don't forget to include the user_id field and its value the UID that you copies in step 8.
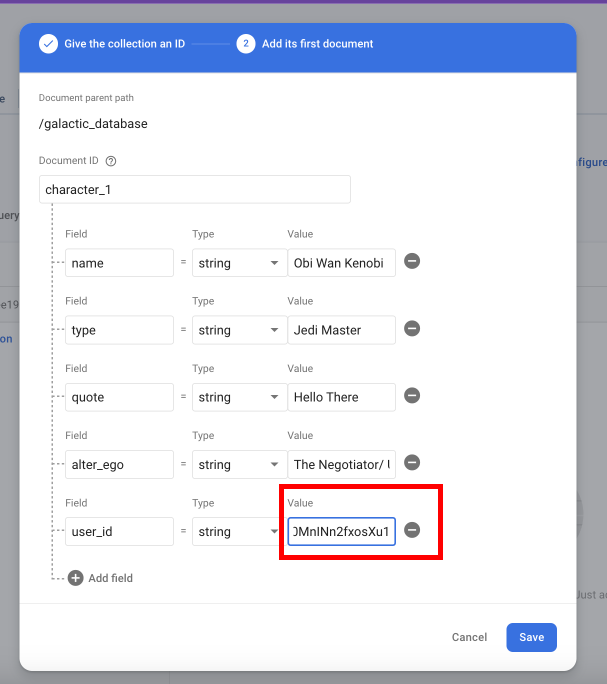
Here you can see the created document with ID "character_1"
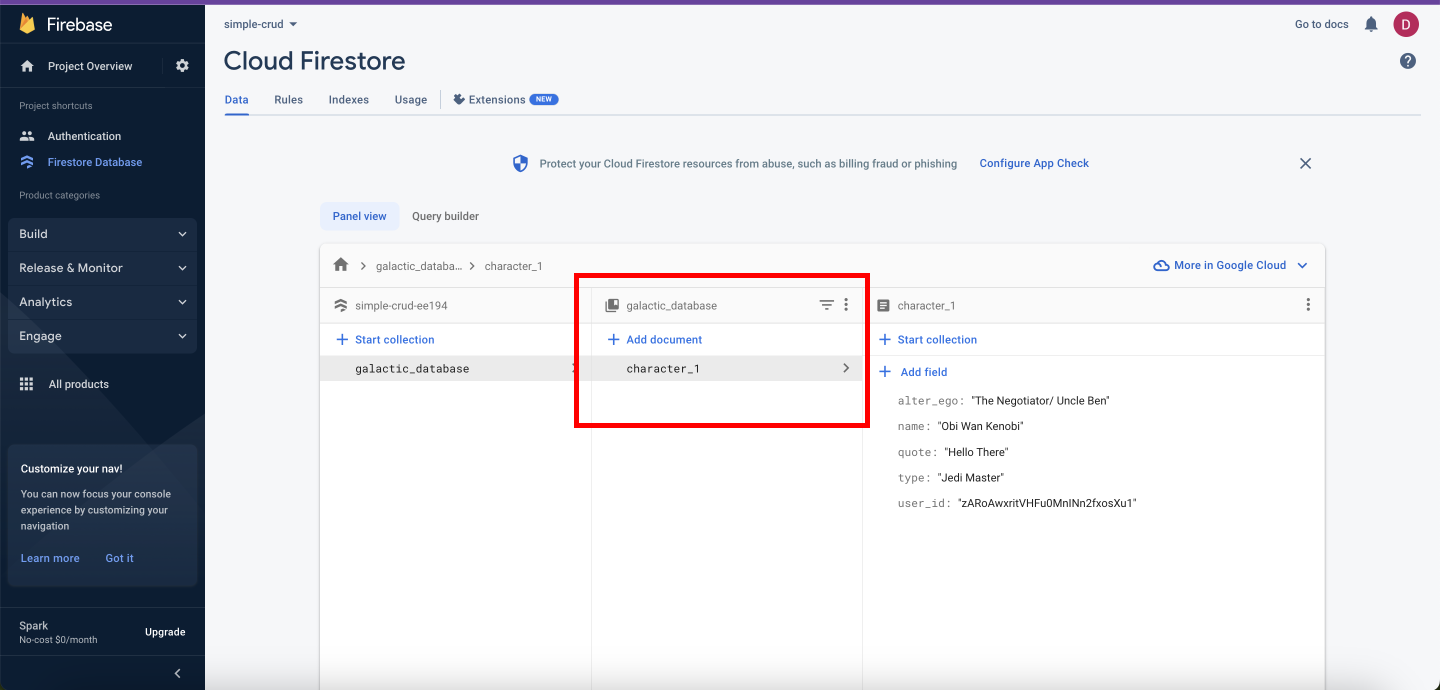
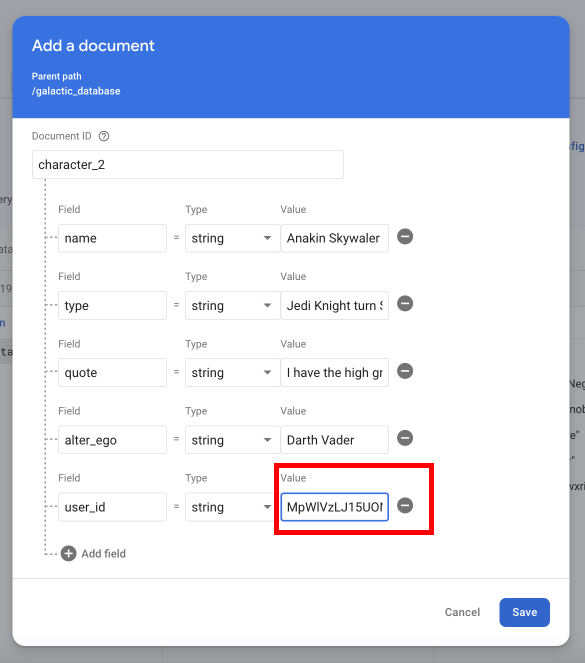
Add another document with ID "character_2".
Step 11: Now from the Firestore's dashboard click on Rules on the top menu. It will take you to Security Rules for your Firestore instance.
Select Edit rules on the top menu. And then in the text area write the following code.
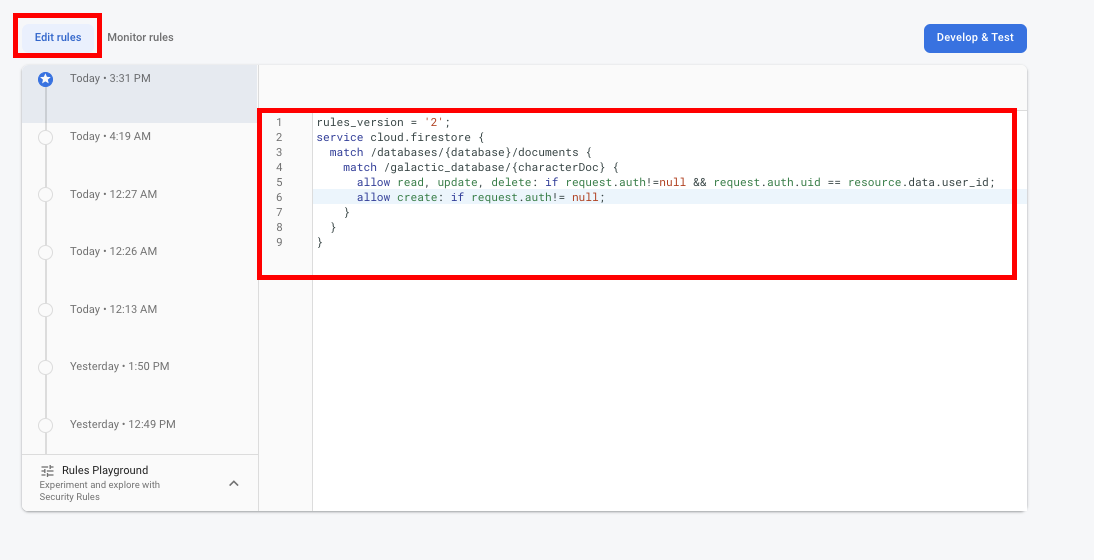
Here in line 4, we are referencing our galactic_database collection and {characterDoc} refers to the document's ID. Then we allow our users to read, update or delete a document if the request header has a user auth object and the uid in auth object is equal to the user_id of that particular document. And we allow users to create a new document if the request header has a user auth object. Here "request" is the request header or payload that has the auth object and "resource.data" is the document object.
rules_version = '2';
service cloud.firestore {
  match /databases/{database}/documents {
    match /galactic_database/{characterDoc} {
      allow read, update, delete: if request.auth!=null && request.auth.uid == resource.data.user_id;
      allow write: if request.auth!= null;
    }
  }
}
Cloud Firestore and Cloud Storage rules use a language based on the Common Expression Language (CEL), that builds on CEL with match and allow statements that support conditionally granted access.
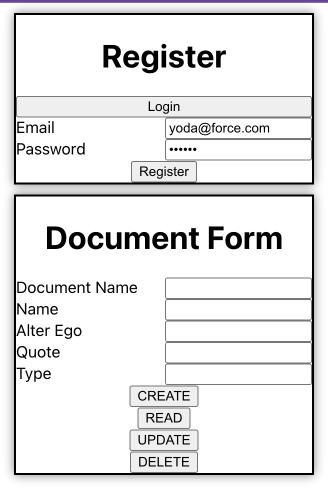
Setting up the UI:

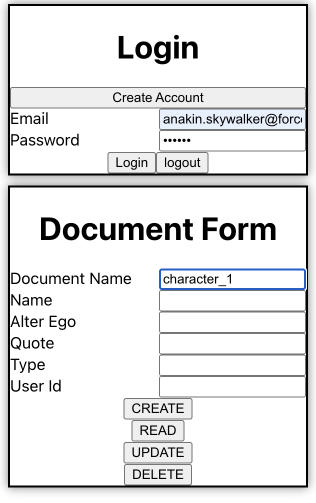
This will be our UI. It has two forms one for login/creating an account and another to display the document's information.
Step 1: npm install firebase. Then in the src folder create util/firebaseSetup.js and add the below code. This is the same code from step 4 in setting up firebase. This will initialize our firebase app, firestore instance, and auth instance. And export them.
// Import the functions you need from the SDKs you need
import { initializeApp } from "firebase/app"; //Firebase SDK for initializing the app
import { getFirestore } from "firebase/firestore"; // Firebase SDK for Cloud Firestore
import { getAuth } from "firebase/auth"; // Firebase SDK for Authentication
// TODO: Add SDKs for Firebase products that you want to use
// https://firebase.google.com/docs/web/setup#available-libraries

// Your web app's Firebase configuration
const firebaseConfig = {
  apiKey: "AIzaSyDlZ3Vo-HP4oWqmOQM3YX7XIR3fdEUccaY",
  authDomain: "simple-crud-ee194.firebaseapp.com",
  projectId: "simple-crud-ee194",
  storageBucket: "simple-crud-ee194.appspot.com",
  messagingSenderId: "432127670236",
  appId: "1:432127670236:web:4d3d5578a086c863ee0119",
};

// Initialize Firebase
const app = initializeApp(firebaseConfig);
// Initualize Firestore
const db = getFirestore(app);
// Initialize Authentication
const auth = getAuth(app);

export { db, auth };
Step 2: In the App.js file add the following code. This will import our Firebase auth and firestore instance, other APIs for auth-related functions like signout, creating new users and firestore's write, read and delete operations.
import { useState } from "react";
import { db, auth } from "./util/firebaseSetup";
import {
  signOut,
  setPersistence,
  signInWithEmailAndPassword,
  createUserWithEmailAndPassword,
  browserSessionPersistence,
} from "firebase/auth";
import { deleteDoc, doc, getDoc, setDoc } from "firebase/firestore";
function App(){
const [userAuth, setUserAuth] = useState(null);
Step 3: Now we write the function for handling login, signup and signout.
For Login:
In this code, we are passing the "event" object from the button click and the "formState" object that stores email and password, it will be explained later. In most cases, people directly use the "signInWithEmailAndPassword()" method to authenticate the user. When the user is authenticated it returns the user auth object and also stores it in the browser's local storage. The user auth object then persists in the browser even after closing the window. Here we are wrapping the sign-in method using "setPersistence()" it takes two arguments the auth instance object(from firebaseSetup.js) and a Persistence object. Later we also stored the user auth in State Hook for future use.
inMemoryPersistence: Has the persistence 'NONE'. The user auth object will be stored in heap memory.
browserSessionPersistence: Has the persistence 'session'. The user auth object will be stored in the session storage of the browser.
browserLocalPersistence: Has the persistence 'local'. The user auth object will be stored in the local storage of the browser.
indexedDBLocalPersistence: It's local too but stores in indexedDB of local. (it's the default for signInWithEmailAndPassword()).
const handleLogin = async (event, formState) => {
    event.preventDefault();
    const { email, password } = formState;
    setPersistence(auth, browserSessionPersistence)
      .then(() => {
        signInWithEmailAndPassword(auth, email, password)
          .then((userCredential) => {
            const user = userCredential.user;
            setUserAuth(user);
            window.alert("Login Success");
          })
          .catch((error) => {
            window.alert(error.message);
          });
      })
      .catch((error) => {
        window.alert(error.message);
      });
  };
For Logout: In the logout function we are simply calling the "signOut()" function, and a callback to clear the component state too.
const handleLogout = (event) => {
    event.preventDefault();
    signOut(auth)
      .then(() => {
        setUserAuth(null);
        window.alert("Logout Success");
      })
      .catch((error) => {
        window.alert(error.message);
      });
  };
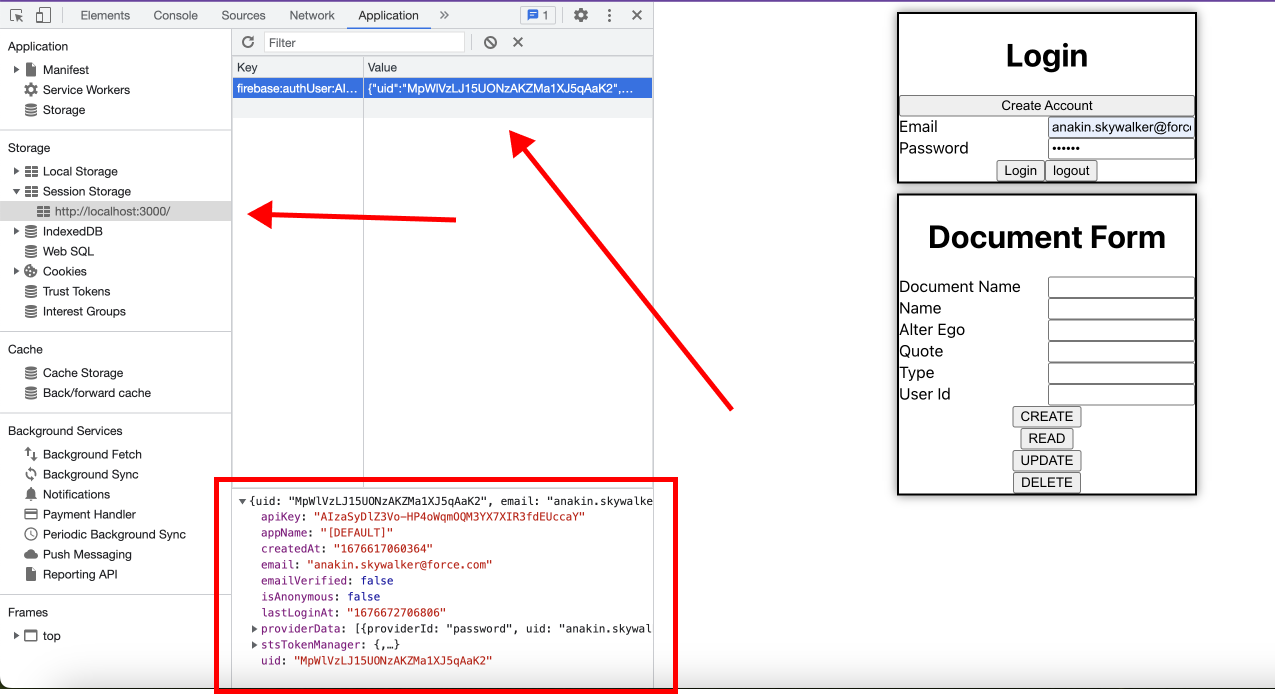
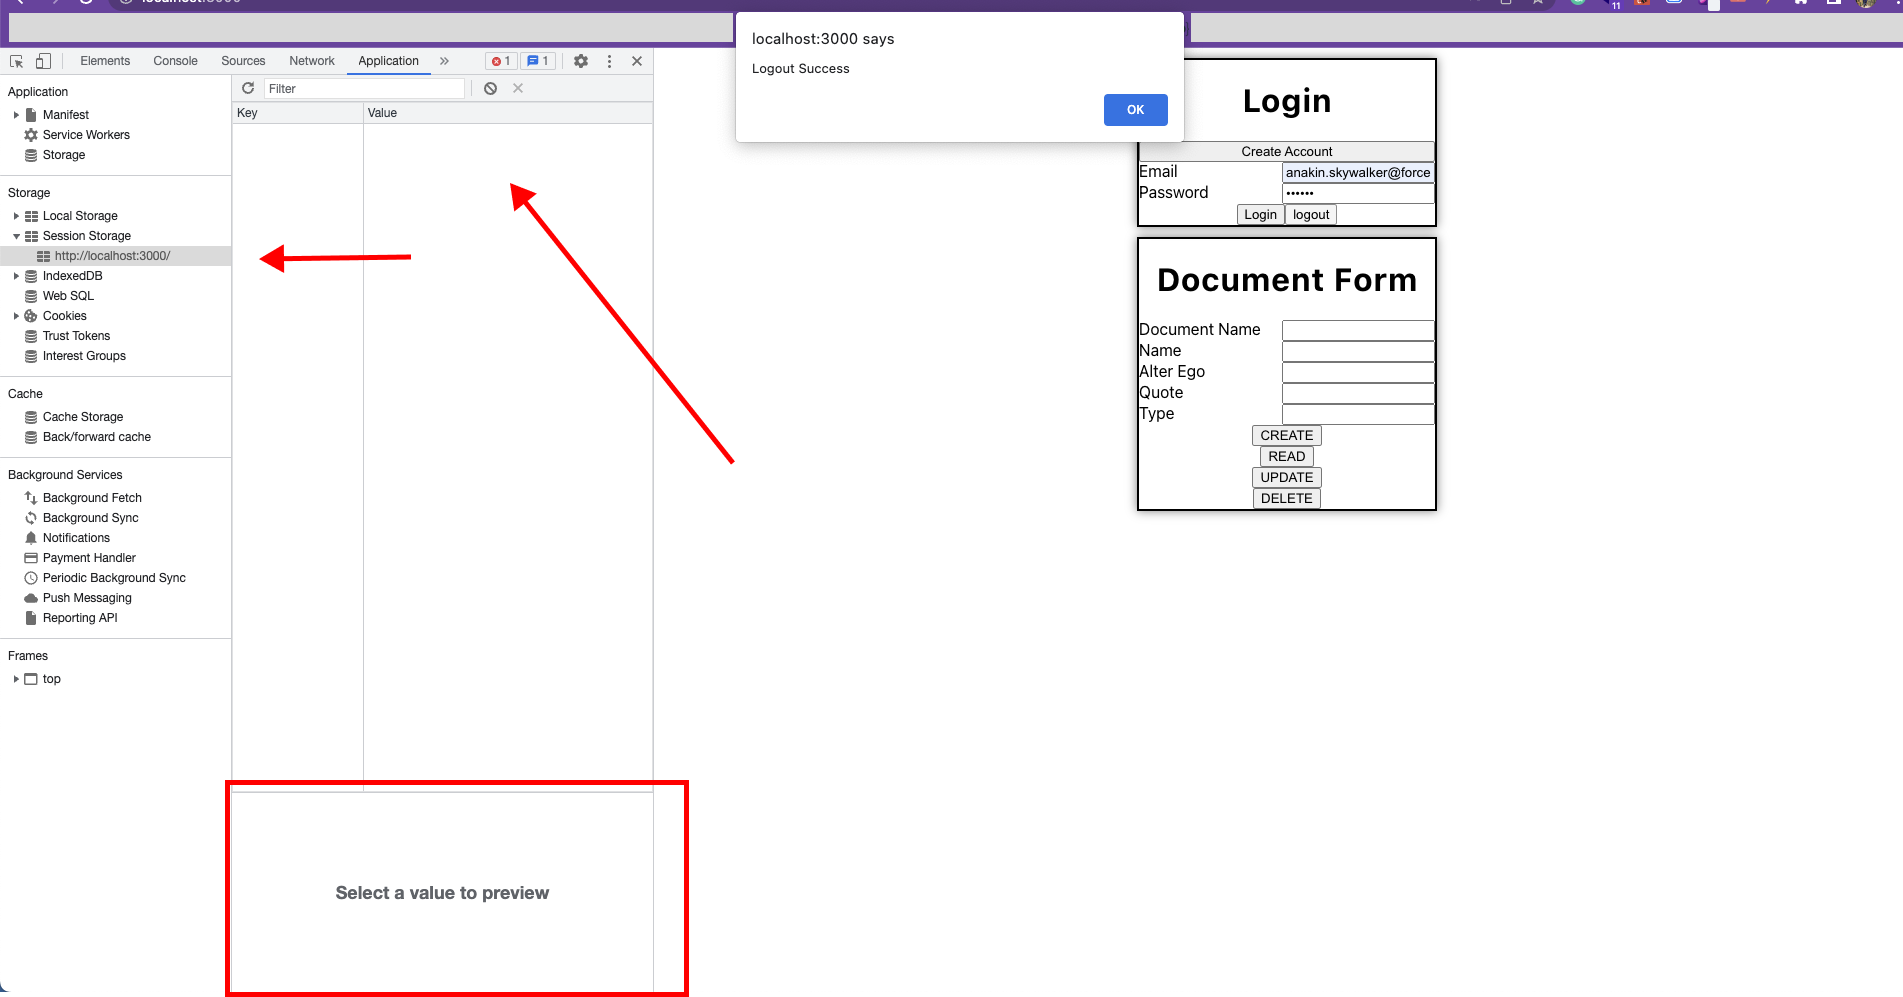
Here you can see on the chrome dev tools when we successfully log in a user auth object is stored in the browser's session storage.
Here on successful logout the user auth object is cleared from the browser's session storage.
For Signup: A.K.A creating a new user. It works similarly to the sign-in function above.
const handleSignup = async (event, formState) => {
    event.preventDefault();
    const { email, password } = formState;
    setPersistence(auth, browserSessionPersistence)
      .then(() => {
        createUserWithEmailAndPassword(auth, email, password)
          .then((userCredential) => {
            const user = userCredential.user;
            setUserAuth(user);
            window.alert("Signup Success");
          })
          .catch((error) => {
            window.alert(error.message);
          });
      })
      .catch((error) => {
        window.alert(error.message);
      });
  };
Step 4: Now we will create functions to handle CRUD operations
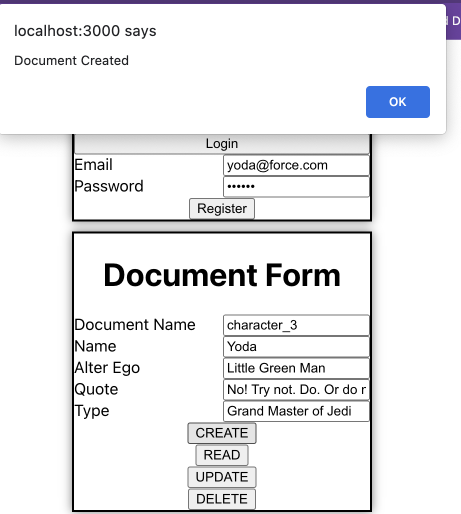
For Create: Here doc() is referencing the document in Firestore. It takes a Firestore instance, the name of the collection and the document ID. Then we call setDoc() and pass doc() and the data object. It will create a document in Firestore "galactic_database" collection with the given document ID. And notice for the user_id field we are using the userAuth state hook. Instead of setDoc() we could use addDoc() but that will create the document with an auto-generated ID.
const handleCreate = async (event, formState) => {
    event.preventDefault();
    try {
      await setDoc(doc(db, "galactic_database", formState["Document Name"]), {
        name: formState["Name"],
        type: formState["Type"],
        quote: formState["Quote"],
        alter_ego: formState["Alter Ego"],
        user_id: userAuth.uid,
      });
      window.alert("Document Created");
    } catch (error) {
      window.alert(error.message);
    }
  };
For Read: Here we are calling getDoc() to get the document, and if it exists saving it in the formState using setFormState.
const handleRead = async (event, formState, setFormState) => {
    event.preventDefault();
    const docRef = doc(db, "galactic_database", formState["Document Name"]);
    try {
      const docSnap = await getDoc(docRef);
      if (docSnap.exists()) {
        window.alert("Document Fetched");
        setFormState((prevState) => ({
          ...prevState,
          Name: docSnap.data().name,
          Type: docSnap.data().type,
          Quote: docSnap.data().quote,
          "Alter Ego": docSnap.data().alter_ego,
        }));
      } else {
        window.alert("Document not found");
      }
    } catch (error) {
      window.alert(error.message);
    }
  };
For Update: It is similar to creating the document. setDoc() creates a new document if it doesn't exist and updates/replaces the existing one. Here, I am replacing the existing values. You could use updateDoc() too.
const handleUpdate = async (event, formState) => {
    event.preventDefault();
    const docRef = doc(db, "galactic_database", formState["Document Name"]);
    try {
      await setDoc(docRef, {
        name: formState["Name"],
        type: formState["Type"],
        quote: formState["Quote"],
        alter_ego: formState["Alter Ego"],
        user_id: userAuth.uid,
      });
      window.alert("Document Updated");
    } catch (error) {
      window.alert(error.message);
    }
  };
For Delete: Here we simply pass the doc reference to deleteDoc() to delete the document.
const handleDelete = async (event, formState) => {
    event.preventDefault();
    const docRef = doc(db, "galactic_database", formState["Document Name"]);
    try {
      await deleteDoc(docRef);
      window.alert("Document Deleted");
    } catch (error) {
      window.alert(error.message);
    }
  };
Remember in Step 11 of setting up Firebase, we wrote the security rules. There we wrote rules to only allow crud operations to request with a user auth object. Then you might be wondering, where are we passing the user auth object? When we call setDoc() or getDoc() functions the auth object is automatically sent with the request. If you signout or manually delete the user auth object from the browser's storage and then try to call setDoc() or getDoc() functions, unless there are no security rules, you will get an error and not be allowed to perform crud operations.
Step 5: Now let us complete the UI code.
Import the LoginForm and DocumentForm components.
import LoginForm from "./component/LoginForm";
import DocumentForm from "./component/DocumentForm";
Structuring the functions in arrays for easy passing to the above components.
  const documentProps = [handleCreate, handleRead, handleUpdate, handleDelete];
  const loginProps = [handleLogin, handleSignup, handleLogout];
The rest of the App.js
return (
    <div className="App">
      <div className="form_content">
        <LoginForm authOps={loginProps} />
      </div>
      <div className="form_content">
        <DocumentForm crudOps={documentProps} />
      </div>
    </div>
  );
}

export default App;
In the App.css file, add the following class style.
.form_content {
  display: flex;
  margin: 10px auto;
  height: 100%;
  width: 300px;
}
Step 6: Create a component folder and add the following files
DocumentForm.jsx
import React, { useState } from "react";
import "./FormStyles.css";
function DocumentForm({ crudOps }) {
  const [handleCreate, handleRead, handleUpdate, handleDelete] = crudOps;
  const defaultState = {
    "Document Name": "",
    Name: "",
    "Alter Ego": "",
    Quote: "",
    Type: "",
    "User Id": "",
  };
  const [formState, setFormState] = useState(defaultState);
  const handleChange = (event) => {
    const { name, value } = event.target;
    setFormState((prevState) => ({ ...prevState, [name]: value }));
  };
  return (
    <div className="form_component_parent">
      <h1>Document Form</h1>
      <form action="">
        {Object.keys(formState).map((key) => {
          return (
            key !== "User Id" && (
              <div className="form_label" key={key}>
                <label htmlFor={key}>{key}</label>
                <input
                  type="text"
                  name={key}
                  id={key}
                  value={formState[key]}
                  onChange={handleChange}
                />
              </div>
            )
          );
        })}
        <div>
          <button onClick={(e) => handleCreate(e, formState)}>CREATE</button>
        </div>
        <div>
          <button onClick={(e) => handleRead(e, formState, setFormState)}>
            READ
          </button>
        </div>
        <div onClick={(e) => handleUpdate(e, formState)}>
          <button>UPDATE</button>
        </div>
        <div>
          <button onClick={(e) => handleDelete(e, formState)}>DELETE</button>
        </div>
      </form>
    </div>
  );
}

export default DocumentForm;
FormStyles.css
.form_component_parent {
  display: flex;
  flex-direction: column;
  justify-content: center;
  height: 100%;
  width: 300px;
  box-shadow: 0 0 10px 0 rgba(0, 0, 0, 0.5);
  border: 2px solid #000000;
}

.form_label {
  display: flex;
  flex-direction: row;
  justify-content: space-between;
  width: 100%;
}
LoginForm.jsx
In the login form, there is a button just below the <h1> tag. It toggles the isLogin state and based on isLogin we either call handleLogin or handleSignup.
import React, { useState } from "react";
import "./FormStyles.css";
function LoginForm({ authOps }) {
  const [handleLogin, handleSignup, handleLogout] = authOps;
  const defaultState = {
    email: "",
    password: "",
  };
  const [formState, setFormState] = useState(defaultState);
  const [isLogin, setIsLogin] = useState(true);
  const handleChange = (event) => {
    const { name, value } = event.target;
    setFormState((prevState) => ({ ...prevState, [name]: value }));
  };
  return (
    <div className="form_component_parent">
      <h1>{isLogin ? "Login" : "Register"}</h1>
      <button onClick={() => setIsLogin(!isLogin)}>
        {isLogin ? "Create Account" : "Login"}
      </button>
      <form
        onSubmit={(e) =>
          isLogin ? handleLogin(e, formState) : handleSignup(e, formState)
        }
        onReset={(e) => handleLogout(e)}
      >
        <div className="form_label">
          <label htmlFor="email">Email</label>
          <input
            type="text"
            name="email"
            id="email"
            value={formState.username}
            onChange={handleChange}
          />
        </div>
        <div className="form_label">
          <label htmlFor="password">Password</label>
          <input
            type="password"
            name="password"
            id="password"
            value={formState.password}
            onChange={handleChange}
          />
        </div>

        <input type="submit" value={isLogin ? "Login" : "Register"} />
        {isLogin && <input type="reset" value="logout" />}
      </form>
    </div>
  );
}

export default LoginForm;
Working in UI:
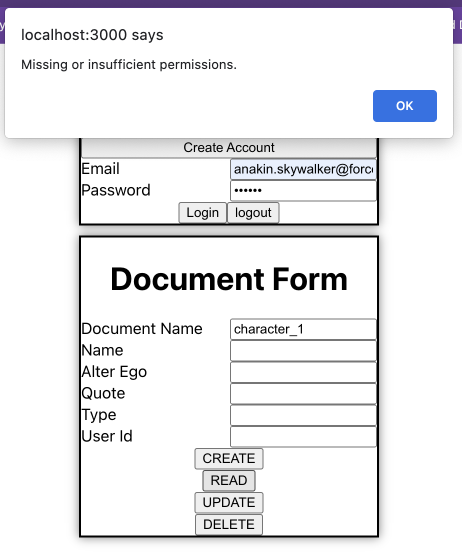
- Here login user Anakin is trying to access the "character_1" document but in "character_1" user_id corresponds to user Obi-Wan.
- So, as expected Anakin's request is denied and he gets an error message.
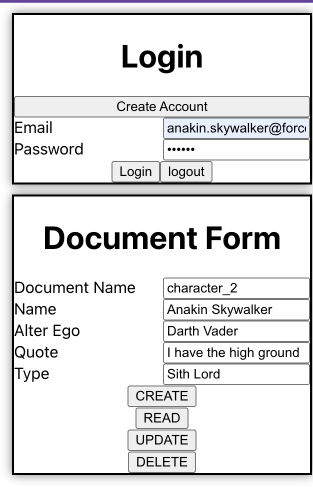
- If Anakin requests document "character_2" his request is granted.
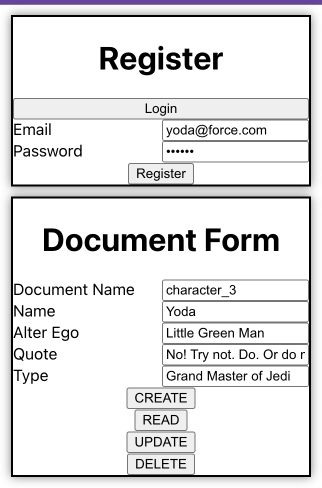
- Now let's create a new user Grand Master Yoda.
Now Yoda has decided to create a new document.
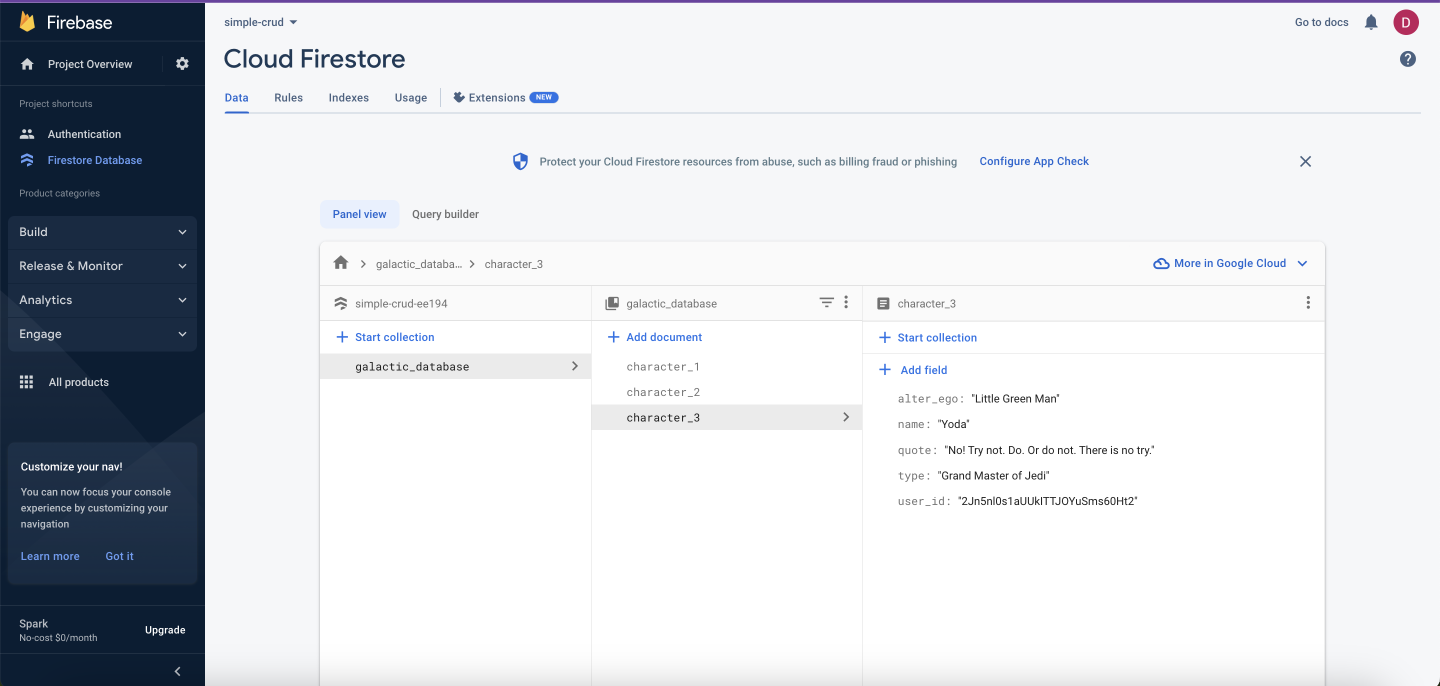
In the Firebase Firestore console, you can see the newly created document.
With this, we have successfully created a ReactJS app with Firebase as its backend, and carry out crud operations for valid users using security rules.
We have only just begun. There are hundreds of more features and configurations to explore. Feel free to dive deeper.
Below is the GitHub repo of the full code.
*Illustration on the blog cover is taken from Image by jcomp on Freepik


