📡How does your Browser renders the website that you see on screen?

A web developer, with a passion for building responsive and performant web apps.
*Note: Explanations in this article are made in the context of the Chrome Browser.
When you type in your favourite website like Facebook.com, your browser springs into action! First, it contacts a special server called DNS to find Facebook's secret code - its IP address. With the address in hand, your browser sets up a series of quick exchanges to say "🙋♂️Hey, I'm here!" and "👍All good, come on in!". Then, your browser receives Facebook's instructions to show you the website - its HTML, CSS and JS. In this article, we'll explore how your browser uses this code to magically display Facebook on your screen.
Some Basics:
Browsers use a single main thread 🧶 to execute the JS code as well as render the webpage. When JS execution takes too long to run, it blocks the main thread. This causes the UI to freeze.
The Rendering Process.
After getting the webpage's code, the browser does a bunch of fun steps one after the other🧑🚒, which are present in the "Rendering Queue". Together these steps are also called the "Rendering Path" or "Critical Rendering Path". Once your browser finishes all the steps, ta-da! The webpage 🔮magically appears on your screen.
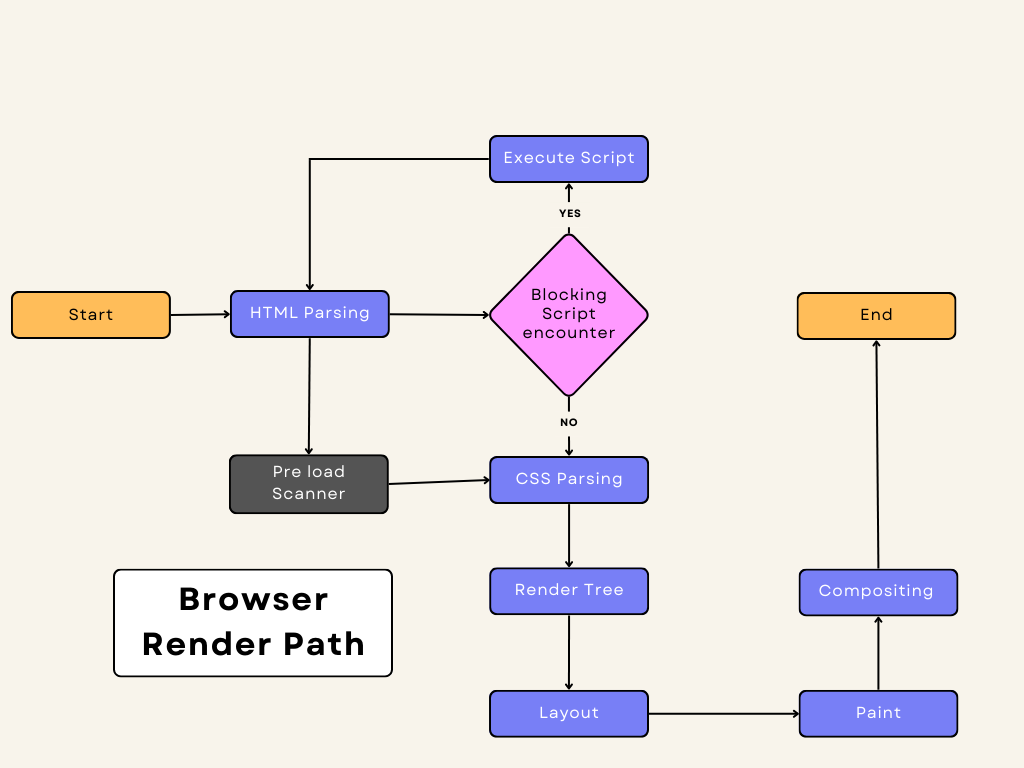
Step 1: HTML Parsing
In this step, the browser parses, or reads the HTML code and creates a 🤝friendly data structure called the DOM to represent the page. The DOM is like an easy-to-use interface that lets you work with HTML. It organizes the page into a simple tree structure, where each part of the tree corresponds to an HTML tag.
While parsing the HTML, if it encounters 🎨 CSS or 🖼️images a separate thread will request those resources thus parsing in the main thread continues without any blocking. This separate thread is called 🪢"Pre Load Scanner".
But for <script>tags, particularly those without an async or defer, the parsing is paused until the JS executes, resulting in considerable render lag.
Step 2: CSS Parsing
Similar to the previous step, the browser now parses the CSS code and builds a friendly data structure called CSSOM. Think of it as a DOM, but for CSS! There's a subtle difference from parsing HTML though. When parsing CSS, the browser can't wait until the entire CSSOM is complete before moving on. That's because CSS styles can 📝override each other - it 🪆"cascades", as the name suggests.
Step 3: Render Tree
Browser now works hard to create what's called a "Render Tree" - this combines the structure of the webpage(the DOM) with the styling rules (the CSSOM) to determine what should be displayed on the screen. Each node will have its corresponding CSS styling rules🤼.
While building the tree, It starts by 🔍looking at the root of the DOM, the topmost element, and then works its way down through all the visible elements on the page.
Any elements that won't be seen on the screen, like the <head> section or elements with display: none styles, get skipped over🏃♂️.
Step 4: Layout
This is a very crucial step, the browser is now figuring out where everything goes!📬 It determines the size and placement of each element from the Render Tree. It also computes their relationship with each other.
On a webpage, almost everything is a box. Since there are so many different devices and display options, there are endless possibilities for how a website might look. At this stage, the browser takes into account the viewing area 🔭and decides on the dimensions of all the boxes to create the perfect layout for your screen.
Layout performance is impacted by the number of nodes in the DOM. Any changes in the DOM or CSSOM causes the browser to re-run the Layout process. Subsequent, re-runs are called "reflows".
Step 5: Painting
In this step, the layout is turned into pixels. The Browser now puts on its painter's 🎩 hat, with 🎨colour and 🧑🎨brush in hand starts painting every visual detail, like text, colours, and images, ensuring buttons and pictures show up just right. The browser zips through this process super speedily like 🚀Flash so websites appear in the blink of an eye!
For smooth, fluid animations on your screen, most computers aim to display 60 frames per second. That means each frame only has 16 milliseconds to be drawn! While browsers are pretty efficient at rendering pages quickly, complex JS animations can strain the rendering process and cause lag or choppy frame rates.
Normally this would be the last step, but sometimes the browser paints the webpage in different layers due to various reasons.
Step 6: Compositing
You may be wondering 🧐 why this extra step is necessary. Well, it's just an optimization technique. Browsers these days are super speedy in rendering, but with all the animations and scrolling on the pages💈, they can still struggle to keep up. To help with this, browsers use a pretty clever trick - they split the page into 🗂️separate layers that are painted individually. Then a separate process called "Compositing" mashes all the layers together into the final page you see. Since the layers are already painted, if you scroll, the compositor can just rearrange the layers into a new view of the page. Pretty neat, huh?🔥 This layering technique helps browsers be as efficient as possible and keeps pages running smoothly.
The whole process from start to finish is called rendering while painting means turning the layout into pixels.
For subsequent re-render, some steps may be skipped.


